linux gstreamer gst
gstreamer, gst-plugins-base, gst-plugins-good, gst-plugins-ugly, gst-plugins-bad
apt install gstreamer-rockchip 安装了gstreamer-rockchip库
gstreamer
https://blog.csdn.net/csdnhuaong/article/details/78015938
rtspsrc: 属性 https://gstreamer.freedesktop.org/documentation/rtsp/rtspsrc.html
测试
gst-launch fakesrc ! tee name=tee1 .src0,src1 ! .sink0, sink1 aggregator ! fakesinkgst-launch-1.0 videotestsrc ! autovideosink
###gst-launch filesrc location="C:\\tmp\\Kalimba.mp3" ! queue ! tee name=stream !
queue ! mp3parse ! matroskamux name=mux ! filesink location="C:\\tmp\\Kalimba_output.mkv" stream. !
queue ! mp3parse ! ffdec_mp3 ! audioconvert ! queue ! goom ! ffmpegcolorspace ! video/x-raw-yuv,width=640,height=480 ! x264enc ! mux.
gst-launch v4l2src ! videoscale ! video/x-raw-yuv,width=400,height=300 !
 tee name=tv ! queue ! xvimagesink sync=false tv. !
 vp8enc speed=2 ! queue ! oggmux ! filesink location=/dev/null'
$1 gst-launch filesrc location=data/video_02.mp4 ! mpf-xml-pipeline-dump location="dump.xml" ! decodebin name=dec ! tee name=t
t. ! mpf-toi name=toi interval=4 duration=2 $3 ! tee name=t2 ! seg.metadata
t2. ! seg2.metadata
t. ! mpf-segmenter name=seg verbose=2 debug=1 ! fakesink dump=true
t. ! mpf-segmenter name=seg2 verbose=2 debug=1 ! fakesink dump=true
Player:
#
gst-launch$VERSION filesrc location=out/video_02_chopped.mp4 ! decodebin name=dec dec. ! ffmpegcolorspace ! ximagesink
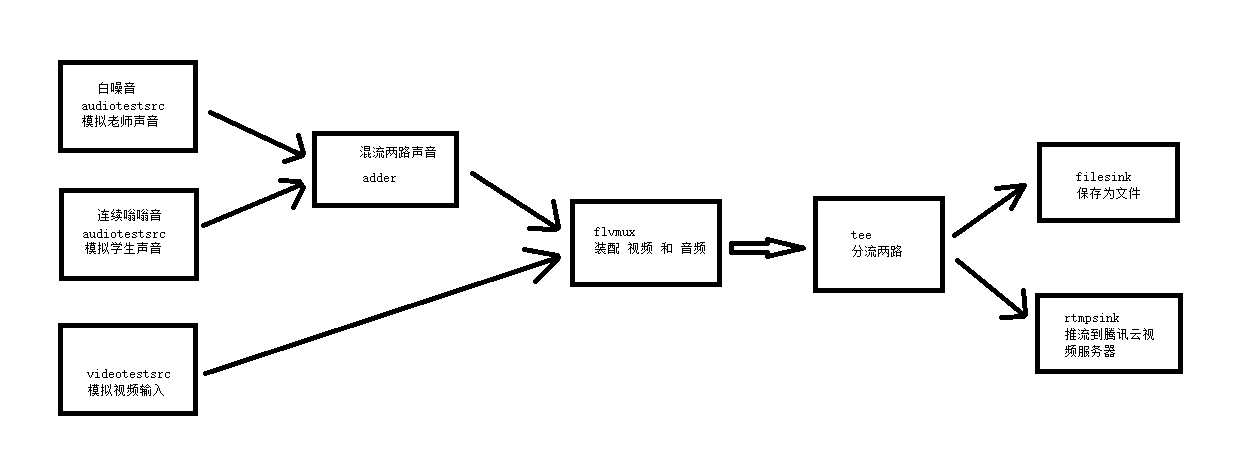
tee 同时保存文件和直播
gst-launch-1.0.exe -v --gst-debug-level=4
flvmux name=mux ! tee name=t ! queue ! filesink name=file location=test.flv
t. ! queue ! rtmpsink location="rtmp://live.abc.com/live/........"
adder name=mix ! queue ! audiorate ! audioconvert ! voaacenc ! mux.audio
videotestsrc name=screen_src ! queue ! videorate ! x264enc ! mux.video
audiotestsrc name=send_audio_src ! queue ! audiorate ! mix.
audiotestsrc wave=5 name=receive_audio_src ! queue ! audiorate ! mix.
命令看起来有点复杂,但其实逻辑挺简单的,看下面这个逻辑图就比较容易理解了
上面的命令中的推流地址需要替换为你的推流地址,如果没有,可以先把下面这部分内容去掉不推流
t. ! queue ! rtmpsink location="rtmp://live.abc.com/live/........"
另外这个命令是在 Windows 中的 MINGW64 的 bash 环境里面运行的, 如果在 Windows 的 cmd 环境中运行,把每行最后的 和换行去掉就可以了。
上面命令中用到了几个关键的插件,分别解释一下:
adder: 音频混流,将两路音频混为一路
voaacenc:音频编码,将原始的音频流编码为 aac 格式
x264enc:视频编码,将原始的视频流编码为 h264 格式
flvmux:flv 组装,将视频和音频组装在一起
tee:分流器,将一路输入变为两路输出,以分别进行后续的处理。一路保存为文件,一路进行推流
filesink:文件存储,将输入数据存储到指定的文件中
rtmpsink:推流,将输入数据推流到指定的视频服务器
斗鱼平台同样采用了 RTMP 协议传输直播视频,
以斗鱼平台为例来说明一下推流到斗鱼的方法。
首先获取斗鱼的 RTMP 推流地址。开启了直播室之后可以获得推流码。注意,斗鱼的推流码是有时限的,取到推流码需要尽快使用以免过期
把这两个参数组合起来(中间加上/)。修改之后的命令例如:
gst-launch-1.0 -v v4l2src device=/dev/video0 ! 'video/x-raw, width=1024, height=768, framerate=30/1' ! queue ! videoconvert ! omxh264enc ! h264parse ! flvmux ! rtmpsink location='rtmp://send1.douyu.com/live/1372rSOMdcBJ8UHD?wsSecret=96d2k4ecdf267d17b8e8c38b6a4a6efd&wsTime=59f92e2e&wsSeek=off live=1'
gstreamer rtmp
gst-launch-1.0 -v v4l2src device=/dev/video0 ! 'video/x-raw, width=1024, height=768, framerate=30/1' ! queue ! videoconvert ! omxh264enc ! h264parse ! flvmux ! rtmpsink location='rtmp://树莓派的IP地址/live live=1'
gst-launch-1.0 -e rtspsrc location='rtsp://admin:huawei777@192.168.0.108/cam/realmonitor?channel=1&subtype=0' protocols=tcp ! rtph265depay ! h265parse ! mppvideodec ! videoscale ! video/x-raw, width=1920, height=1080 ! mpph264enc ! flvmux ! rtmpsink location='rtmp://0.0.0.0/live live=1'
gst-inspect-1.0 |grep rtp # 查看rtsp
h264 编码
gstreamer rtsp 保存mp4 h.265 编码
- mac安装组件
brew install gst-plugins-base gst-plugins-good gst-plugins-bad gst-plugins-ugly gst-launch-1.0 -e rtspsrc location='rtsp://admin:huawei777@192.168.0.108/cam/realmonitor?channel=1&subtype=0' protocols=tcp ! rtph265depay ! h265parse ! mp4mux ! filesink location=camera.mp4保存mp4gst-launch-1.0 -e rtspsrc location='rtsp://admin:huawei777@192.168.0.108/cam/realmonitor?channel=1&subtype=0' protocols=tcp ! rtph265depay ! h265parse ! mppvideodec ! rkximagesink sync=false硬件解码播放
循环录像问题 265编码
gst-launch-1.0 -e rtspsrc location='rtsp://admin:huawei777@192.168.0.108/cam/realmonitor?channel=1&subtype=0' protocols=tcp ! rtph265depay ! h265parse ! splitmuxsink location=video%02d.mp4 max-files=1000 max-size-time=100000
max-files: 最大文件数
max-size-time: 最大保存时间 单位是ns
gst-launch-1.0 -e rtspsrc location='rtsp://admin:huawei777@192.168.0.108/cam/realmonitor?channel=1&subtype=0' protocols=tcp ! rtph265depay ! h265parse ! tee name=t ! queue ! splitmuxsink location=video%02d.mp4 max-files=1000 max-size-time=100000 t. ! queue ! mppvideodec ! rkximagesink sync=false
sync=false 保证无延时
gst rtst 转mp4
URLA='rtsp://admin:huawei777@192.168.0.108/cam/realmonitor?channel=1&subtype=0'
RTSPSRC_SETTINGS='ntp-sync=true protocols=GST_RTSP_LOWER_TRANS_TCP ntp-time-source=1'
GST_DEBUG=3 gst-launch-1.0 -e \
    rtspsrc location=$URLA $RTSPSRC_SETTINGS \
    ! queue ! capsfilter caps="application/x-rtp,media=video" \
    ! rtph264depay ! h264parse \
    ! mp4mux ! filesink location=two.mp4

    gst-launch-1.0 -e rtspsrc location='rtsp://admin:huawei777@192.168.0.108/cam/realmonitor?channel=1&subtype=0' protocols=tcp ! rtph264depay ! h264parse ! mp4mux ! filesink location=camera.mp4
   gst-launch-1.0 -e rtspsrc location='rtsp://admin:huawei777@192.168.0.108/cam/realmonitor?channel=1&subtype=0' protocols=tcp ! decodebin ! x264enc ! mp4mux ! filesink location=camera.mp4
    ! decodebin ! x264enc ! mp4mux !


gst-launch-1.0 -e rtspsrc location=rtsp://admin:pangani123@192.168.1.240:554/LiveMedia/ch1/Media1 ! rtph264depay ! h264parse ! mp4mux ! filesink location=out.mp4

gst-launch-1.0 -v -e rtspsrc location='rtsp://admin:huawei777@192.168.0.108/cam/realmonitor?channel=1&subtype=0' ! rtph264depay ! h264parse  ! mpegtsmux ! hlssink max-files=5 target-duration=5


#gst-launch-1.0 -e rtspsrc location=rtsp://admin:moldeoneo@192.168.0.132:10554/udp/av0_1 ! decodebin ! videocrop top=0 left=0 right=0 bottom=0 ! videoconvert ! capsfilter caps=video/x-raw,format=GRAY8 ! videoconvert ! jpegenc quality=50 ! multipartmux boundary=spionisto ! tcpclientsink port=10001

#ffmpeg -v info -rtsp_transport tcp -i rtsp://admin:moldeoneo@192.168.0.148:10544/udp/av0_1 -c:v copy -c:a copy -maxrate 400k -bufsize 1835k -pix_fmt yuv420p -flags -global_header -hls_time 10 -hls_list_size 6 -hls_wrap 10 -start_number 1 /var/www/testhls.m3u8

#gst-launch-1.0 -e rtspsrc location=rtsp://admin:moldeoneo@192.168.0.148:10544/udp/av0_1 ! decodebin ! videocrop top=0 left=0 right=0 bottom=0 ! videoconvert ! capsfilter caps=video/x-raw,format=GRAY8 ! videoconvert ! x264enc ! mp4mux ! filesink location=/var/www/cam148.mp4

#gst-launch-1.0 -e rtspsrc location=rtsp://admin:moldeoneo@192.168.0.148:10544/udp/av0_0 ! decodebin ! videocrop top=0 left=0 right=0 bottom=0 ! videoconvert ! capsfilter caps=video/x-raw,format=GRAY8 ! videoconvert ! autovideosink

gst-launch-1.0 videotestsrc is-live=true ! x264enc ! mpegtsmux ! hlssink playlist-root=http://192.168.0.125/hls location=/var/www/hls/hls.%05d.ts playlist-location=/var/www/hls/playlist.m3u8
1. gst-launch
1.1 Basics
gst-launch将多个element连成一个pipeline,用于快速测试、验证功能等。elements之间用感叹号进行连接。
gst-launch-1.0.exe videotestsrc ! autovideosink
1.1.1 设置属性
element可以是有属性的,用“属性=值”的方式设置属性,多个属性用空格分开。可以用gst-inspect工具来查看element的属性。
gst-launch-1.0.exe videotestsrc pattern=11 ! autovideosink
1.1.2 带名称的element
如果在后续要使用之前创建的element,则该element必须要设置名称属性,带名字的element在使用名字时需要在后面加一个点。
gst-launch-0.10 videotestsrc ! ffmpegcolorspace ! tee name=t ! queue ! autovideosink t. ! queue ! autovideosink
1.1.3 设置pad
一个element可能会有多个pad,如果要指定pad进行连接,那么可以在命名element后使用.+pad名字来实现。
gst-launch-0.10.exe souphttpsrc location=http://docs.gstreamer.com/media/sintel_trailer-480p.webm ! matroskademux name=d d.video_00 ! matroskamux ! filesink location=sintel_video.mkv
这个命令使用souphttpsrc在internet上锁定了一个媒体文件,这个文件是webm格式的。我们可以用matroskademux来打开这个文件,因为媒体包含音频和视频,所以我们创建了两个输出Pad,名字分别是video_00和audio_00。我们把video_00和matroskamux element连接起来,把视频流重新打包,最后连接到filesink,这样我们就把流存到了一个名叫sintel_video.mkv的文件。
1.1.4 caps过滤
除了上述指定pad的方法外,还可以设置caps过滤,设置当前element的输出类型。
gst-launch-0.10 souphttpsrc location=http://docs.gstreamer.com/media/sintel_trailer-480p.webm ! matroskademux ! video/x-vp8 ! matroskamux ! filesink location=sintel_video.mkv
在matroskademux后加一个video/x-vp8的Caps过滤,这样就表明在matroskademux中我们仅仅需要能生成这种类型视频的输出Pad。
1.1.5 查看pipeline中的caps
在gst-launch后加 -v 选项,就可以查看pipeline中每个element具体选择了哪些pad
gst-launch-1.0 -v videotestsrc! autovideosink
/GstPipeline:pipeline0/GstVideoTestSrc:videotestsrc0.GstPad:src: caps = video/x-raw, format=(string)I420, width=(int)320, height=(int)240, framerate=(fraction)30/1, multiview-mode=(string)mono, pixel-aspect-ratio=(fraction)1/1, interlace-mode=(string)progressive
/GstPipeline:pipeline0/GstAutoVideoSink:autovideosink0.GstGhostPad:sink.GstProxyPad:proxypad0: caps = video/x-raw, format=(string)I420, width=(int)320, height=(int)240, framerate=(fraction)30/1, multiview-mode=(string)mono, pixel-aspect-ratio=(fraction)1/1, interlace-mode=(string)progressive
/GstPipeline:pipeline0/GstAutoVideoSink:autovideosink0/GstD3DVideoSink:autovideosink0-actual-sink-d3dvideo.GstPad:sink: caps = video/x-raw, format=(string)I420, width=(int)320, height=(int)240, framerate=(fraction)30/1, multiview-mode=(string)mono, pixel-aspect-ratio=(fraction)1/1, interlace-mode=(string)progressive
/GstPipeline:pipeline0/GstAutoVideoSink:autovideosink0.GstGhostPad:sink: caps = video/x-raw, format=(string)I420, width=(int)320, height=(int)240, framerate=(fraction)30/1, multiview-mode=(string)mono, pixel-aspect-ratio=(fraction)1/1, interlace-mode=(string)progressive
1.2. Examples
1.2.1 直接浏览视频流
1.2.1.1 test video
gst-launch-1.0 videotestsrc ! autovideosink
1.2.1.2 ipc码流
1.2.1.2.1 playbin
gst-launch-1.0 playbin uri=rtsp://172.16.66.66:554/id=1
1.2.1.2.2 uridecodebin
gst-launch-1.0 uridecodebin uri=rtsp://172.16.66.66:554/id=1 ! autovideosink
1.2.1.2.3 rtspsrc
gst-launch-1.0 rtspsrc location=rtsp://172.16.66.66:554/id=1 ! rtph264depay ! avdec_h264 ! autovideosink

gst-launch-1.0 rtspsrc location=rtsp://172.16.66.66:554/id=1 ! decodebin3 ! autovideosink
Rtsp浏览MJEPG码流(码流源就是一张张的jpeg)
gst-launch-1.0.exe rtspsrc location="rtsp://172.16.66.65:554/realtime?id=0;aid=0;agent=onvif" ! rtpjpegdepay ! jpegdec ! autovideosinkrtph264depay 用于将rtp包解包
avdec_h264 将h264码流解码
1.2.2 录制视频流
把视频流编码成H264格式,并转为MPEG-TS传输流。
1.2.2.1 test video
win
gst-launch-1.0 -e videotestsrc ! video/x-raw, framerate=25/1, width=640, height=360 ! x264enc ! filesink location=test.ts

linux
gst-launch-1.0 -e videotestsrc ! video/x-raw, framerate=25/1, width=640, height=360 ! x264enc ! filesink location=/mnt/hgfs/wintmp/wms/test.ts
- video/x-raw 设置流的类型,也可以不设置采用默认选择
- x264enc 将原始码流编码,再保存成文件
- -e 选项可以在我们关闭pipeline之前强制关闭给视频源发出EOS信号,适用于用CTRL+C或者kill命令来关闭gst-launch
也可以加上混合器mpegtsmux
gst-launch-1.0 -e videotestsrc ! video/x-raw, framerate=25/1, width=640, height=360 ! x264enc ! mpegtsmux ! filesink location=test.ts
1.2.2.2 ipc
win
gst-launch-1.0 -e rtspsrc location=rtsp://172.16.66.66:554/id=1 ! rtph264depay ! h264parse ! avdec_h264 ! x264enc  ! filesink location=test2.ts

linux
gst-launch-1.0 -e rtspsrc location=rtsp://172.16.66.66:554/id=1 ! rtph264depay ! h264parse ! avdec_h264 ! x264enc  ! filesink location=/mnt/hgfs/wintmp/wms/test2.ts
- 没有 ! avdec_h264 ! x264enc ,录制的文件无法播放
- h264parse 可以不用
1.2.3 Rtsp推流
1.2.3.1 file
win
gst-launch-1.0 -v filesrc location="D:\\tmp\\wms\\build\\build.debug\\local\\x86_64\\test.ts" ! h264parse ! rtph264pay config-interval=1 pt=96 ! udpsink host=127.0.0.1 port=5000

linux
gst-launch-1.0 -v filesrc location=/mnt/hgfs/wintmp/wms/test.ts ! h264parse ! rtph264pay config-interval=1 pt=96 ! udpsink host=172.16.64.68 port=5000
- host为目标ip
如果录制文件时用了混合器,则在推流时要用相应的分离,例如tsdemux
gst-launch-1.0 -v filesrc location="D:\tmp\wms\build\build.debug\local\x86_64\test.ts" ! tsdemux ! h264parse ! rtph264pay config-interval=1 pt=96 ! udpsink host=127.0.0.1 port=5000
1.2.3.2 ipc
win
gst-launch-1.0 rtspsrc location=rtsp://172.16.66.66:554/id=1 ! rtph264depay ! h264parse ! rtph264pay config-interval=1 pt=96 ! udpsink host=127.0.0.1 port=5000

linux
gst-launch-1.0 rtspsrc location=rtsp://172.16.66.66:554/id=1 ! rtph264depay ! h264parse ! rtph264pay config-interval=1 pt=96 ! udpsink host=172.16.64.58 port=5000
1.2.3.3 receive
gst-launch-1.0 udpsrc port=5000 ! application/x-rtp, clock-rate=90000,payload=96 ! rtph264depay ! avdec_h264 ! autovideosink
Extensions
test server
rtsp-server-test "( videotestsrc pattern=white ! timeoverlay valignment=3 halignment=4 time-mode=2 xpos=0 ypos=0 color=4278190080 font-desc=\"Sans 48\" draw-shadow=false draw-outline=falseoutline-color=4278190080 ! video/x-raw, format=(string)I420, width=(int)320, height=(int)240 ! x264enc bitrate=512 key-int-max=5 ! rtph264pay pt=96 name=pay0 audiotestsrc freq=440 wave=sine ! audio/x-raw, rate=(int)8000, channels=(int)1 ! alawenc ! rtppcmapay pt=97 name=pay1 )"
gst-launch-1.0.exe rtspsrc location=rtsp://127.0.0.1:8553/test ! rtph264depay ! avdec_h264 ! jpegenc ! multifilesink location="test/%05d.bmp"
Additional Gstreamer commands
Mixing
How to mix two test streams (videobox, videomixer)
gst-launch-1.0 videomixer name=mixer ! gtksink
videotestsrc ! videoscale ! video/x-raw,width=960,height=540 !
tee name=t ! queue ! videoconvert ! videobox left=-960 ! videoconvert ! mixer.
t. ! queue ! videobox left=0 ! videoconvert ! mixer.
Join multiple video parts in one video
gst-launch-1.0 splitmuxsrc location=video*.mp4 ! h264parse ! mp4mux ! filesink location=out.mp4
Using FFMPEG
ffmpeg -f concat -safe 0 -i <(for f in ./*.mp4; do echo "file '$PWD/$f'"; done) -c copy all.mp4
Networking
TCP
Test stream (videotestsrc)
send
gst-launch-1.0 videotestsrc ! videoscale ! video/x-raw,width=100,height=100 !
x264enc tune="zerolatency" ! mpegtsmux ! tcpserversink host=127.0.0.1 port=5000receive
gst-launch-1.0 tcpclientsrc port=5000 host=127.0.0.1 ! tsdemux !
h264parse ! avdec_h264 ! videoconvert ! gtksink
From webcamera (v4l2src)
send
gst-launch-1.0 v4l2src ! jpegenc ! tcpserversink host=localhost port=5000
receive
gst-launch-1.0 tcpclientsrc port=5000 ! jpegdec ! videoconvert ! autovideosink sync=true
Video Record
RTSP
Recording video to multiple files (duration 1 minute)
gst-launch-1.0 rtspsrc location=rtsp://... drop-on-latency=true latency=0 ! \
rtph264depay ! h264parse ! splitmuxsink location=video%02d.mp4 max-size-time=60000000000
FPS measurements
RTSP
gst-launch-1.0 -v rtspsrc location=rtsp://... drop-on-latency=true latency=0 ! \
decodebin ! videoconvert ! video/x-raw,format=RGB ! videoconvert ! \
fpsdisplaysink video-sink=fakesink signal-fps-measurements=True
Jetson
gst-launch-1.0 filesrc location=video.mp4 ! qtdemux name=demux1 demux1.video_0 ! \
queue ! h264parse ! omxh264dec ! fpsdisplaysink video-sink=fakesink signal-fps-measurements=True
Format Conversion
H264 -> RGBA
Jetson
 gst-launch-1.0 -v -e filesrc location=video2560.mp4 ! qtdemux name=demux1 demux1.video_0 ! queue ! \
 h264parse ! omxh264dec ! nvvidconv ! video/x-raw,format=RGBA ! \
 fpsdisplaysink video-sink=fakesink signal-fps-measurements=True
MPEG -> MP4
gst-launch-1.0 filesrc location=video.mpeg ! mpegpsdemux ! h264parse ! mp4mux ! filesink location=video.mp4 sync=False -e
Take snapshot
RTSP
 gst-launch-1.0 -v rtspsrc location=... drop-on-latency=true latency=0 num-buffers=1 ! \
 decodebin  !  videoconvert ! jpegenc ! multifilesink location=img101.jpg
Video Processing
Change Width/Height (Using videoscale plugin)
scales video to Full HD (1920x1080)
gst-launch-1.0 filesrc location=video.mp4 ! decodebin ! videoconvert ! videoscale !
video/x-raw,width=1920,height=1080 ! videoconvert !
x264enc tune=zerolatency bitrate=16384 ! filesink location=video.mp4 -e
Change FPS of video (Using videorate plugin)
making video with 15 FPS
gst-launch-1.0 filesrc location=video.mp4 ! decodebin ! videoconvert ! \
videorate ! video/x-raw,framerate=15/1 ! videoconvert !
x264enc tune=zerolatency bitrate=16384 ! filesink location=video.mp4
Streaming from Youtube
gst-launch-1.0 souphttpsrc is-live=true location="$(youtube-dl -f mp4 -g https://www.youtube.com/watch?v=xjDjIWPwcPU)" \
! decodebin ! videoconvert ! gtksink sync=false
Note:
- youtube-dl allows to get HTTPS URL for youtube video link.